
Tutor filming stitches from above
This tutor wants to keep both hands free while sewing and show the repair area clearly on camera. The light stand and camera mount need to be considered separately.


Choose a set-up that lets you position the camera steadily above your work and aim and dim the light over the repair area. Then take a test shot to check that the stitches, your hands, the fabric and the white background are all clearly visible. A high CRI alone does not guarantee accurate colours. Canon Europe describes white balance as a camera setting that helps reproduce colours accurately in your shot.
This tutor wants to keep both hands free while sewing and show the repair area clearly on camera. The light stand and camera mount need to be considered separately.
This maker wants to show the differences between fabric and thread clearly, so they pay attention to both the lighting specifications and the camera’s white balance. Canon Europe and Lume Cube respectively describe white balance and the colour rendering of light as relevant factors.
This maker wants to position the light and phone without them getting in the way of the repair work. UBeesize describes its 10-inch version as having a tripod that can also stand on a table.
First, decide how to position the camera above the work surface and how much room the set-up will take up. Then, use a test shot to check that the fabric, your hands and the white background are clearly visible.
| What to consider | What should you check? | Who should prioritise this? |
|---|---|---|
| Clear work surface and overhead view | Check the working height, tilt, stability and separate camera mount. | If you film stitches from above, you’ll want your hands to move freely while keeping the repair area in shot. Around 31% of consumers prioritise a clear work surface and a stable overhead view. |
| Fabric colours against white | Compare the CRI and adjustable light colour of the specific version; take a test shot and set the white balance. | When explaining fabric and thread, you’ll want to distinguish their colours from the background. Around 31% of consumers prioritise clear colour reproduction. |
| Visibility during video | Check that you can dim and aim the light; record a short video using your intended camera settings. | If you’re filming a lesson continuously, you’ll want your hands and actions to remain visible on screen. Around 23% of consumers make visibility during video their top priority. |
| Space and what’s included | Check the tripod base, phone or camera mount, power supply and the space you’ll need to work. | At a small work table, you’ll want a set-up that doesn’t get in the way of repairs and includes the parts you need. Around 15% of consumers prioritise a compact set-up and a suitable kit. |
CRI describes the colour rendering of the light source, but it isn’t the only factor that determines how colours appear in the finished video. The camera’s white balance also plays a part.
Compare the specifications for the exact version of the light and assess the fabric and white background together in a test shot.
The tilt of the light head and the supplied phone or camera mount are separate features. An adjustable light head won’t automatically hold the camera at the angle you want.
Check both mounts and make sure there’s enough room for your hands before choosing a set-up.
You may need a separate, compatible camera mount.
Different versions from the same brand may come with different accessories and plug types.
Check the power supply and contents of the specific version you want to buy, including information for the Dutch market.
The manufacturer describes the RL-18 kit as a ring light with a tripod, phone holder and colour filters for video and product photography.
According to the manufacturer, the Ring Light 18 Inch has a tilting light head for top-down lighting.
The manual describes the LR150 as a continuous ring light with a phone holder, suitable for video among other uses.
The manufacturer describes the Aura as having an adjustable head, phone holder and telescopic stand.
The manufacturer describes the 18-inch Bi-Color Ring Light Kit as a portable set powered by mains electricity or the supplied batteries.
This selection includes a compact 10-inch ring light with a tripod and phone holder, and a 4-inch ring light that attaches to a smartphone. Check that the mount you choose allows for a stable overhead view of your work surface, and check the CE marking and product information for the specific light and supplied power supply.
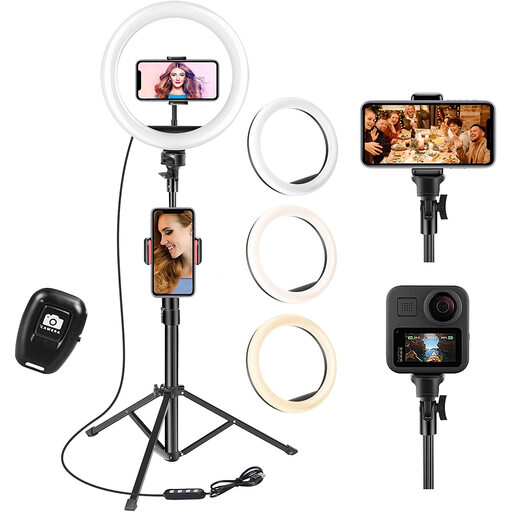 Image unavailable
An option for smartphone video if you want to mount the light on a tripod.
The product name specifies a 63-inch tripod. The product information lists three colour temperatures and ten brightness levels.
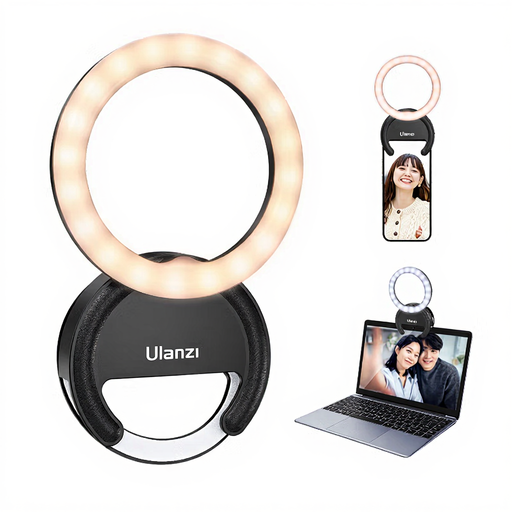 Image unavailable
A compact option if you want to attach a ring light to your smartphone for video.
The product name specifies three colour temperatures from 3000 K–7000 K and five brightness levels.
Assess the lighting in a test shot that includes both the fabric and the white background. Also set your camera’s white balance; a white background alone doesn’t guarantee accurate fabric colours.
It depends on the light, tripod and camera mount. Lume Cube says the Ring Light 18 Inch can tilt by 180° for top-down lighting; check separately that the light and camera can be positioned securely above your work surface.
According to the manual, keep a Godox LR150 dry and don’t use it in damp conditions. For the NEEWER RL-18 kit, the manufacturer recommends fully spreading the tripod legs.
No, not just to ensure you’re entitled to a product that works as it should: statutory guarantees apply in the Netherlands, and the seller is your point of contact if there’s a fault, according to the Dutch government. Extra cover may provide additional rights; check the terms and conditions.
Check the CE marking and product information for the specific light and supplied power supply. According to Your Europe, European Union, CE marking is required when applicable harmonised EU rules specify it for the version in question.