
Teachers who want to reduce hand shadows
If you film a lesson from above, you’ll want your brushstroke to stay visible as your hand moves across the paper. ULANZI recommends recording a real writing movement to see how the shadow shifts.


Start by working out where the camera will go and how much room your hand needs. Then choose a ring light with a mount and reach that suit your table. An adjustable ring light can be useful on a small work surface, but it won’t automatically stop your hand from casting a shadow over your brushstroke. Try a real writing movement, and consider using two light sources if the shadow persists. Before you buy, also check the power requirements and CE marking for the exact version.
If you film a lesson from above, you’ll want your brushstroke to stay visible as your hand moves across the paper. ULANZI recommends recording a real writing movement to see how the shadow shifts.
If you need to fit paper, writing space and a camera on a small work surface, it’s worth checking the table edge, depth and room for the support in advance. ULANZI highlights these dimensions when planning a compact overhead set-up.
If you’re demonstrating coloured ink, you’ll want to adjust the brightness and colour temperature, then check the colours in a test recording. Adjustable settings help you fine-tune the light, but they can’t guarantee how colours will appear on every phone.
First decide where the camera and your hand need to go. Then choose between a clamp arm, a tabletop tripod, a separate light with its own support, or more than one light source.
Choose this if: your table edge can take a clamp and you want to keep the writing surface clear.
Bear in mind: the space needed for the clamp, the arm’s reach and whether you’ll need a separate phone mount.
Choose this if: you want a portable set-up and have space beside the paper.
Bear in mind: the tripod takes up work space; check whether your phone can sit directly above the writing line.
Choose this if: you want to position the light and camera separately, and already have a suitable support or want to choose one separately.
Bear in mind: the support and power supply must suit the exact model and the position you want.
Choose this if: a test recording shows that one ring light still casts a shadow over the active brushstroke.
Bear in mind: two lights need more space and may require extra supports and power sockets.
| What to consider | What to look for | Who is this for? |
|---|---|---|
| Shadow over the brushstroke | Film a real writing movement and check whether you can move the light in relation to the camera. | If I want the nib and active writing line to stay visible as my hand moves, I’ll focus on the light’s position. Around 33% of consumers put hand shadows first. |
| Clear work space | Measure the usable table edge and depth, then compare them with the mount and reach of the version you’re considering. | When space for my paper and hands is limited, I want to make sure a support doesn’t block the writing area. Around 27% of consumers prioritise keeping the table clear. |
| Paper and ink colours | Compare test recordings with different brightness and colour settings, using the lighting you’ll have during the lesson. | If I’m demonstrating coloured ink, I want to adjust how the light falls on my paper and lettering. Around 20% of consumers prioritise colour adjustment. |
| Support and power supply | Check what’s included and the power requirements for the exact model; make sure you can position the camera above the paper. | When I want to set everything up without missing supports or an unsuitable power supply, I check the components included with each version. Around 20% of consumers prioritise a complete, suitable set-up. |
Where the shadow falls depends on the position of the light and how your hand moves. Diffusion can soften the edge of a shadow, but it won’t change where it falls.
Record a full brushstroke and move the light first if the shadow falls across the active line.
If one light source isn’t enough, you may need a second.
A holder on its own doesn’t tell you whether the camera can reach a position above your paper without getting in the way of your hand.
Check what’s included with the exact version, along with the camera angle, reach and room for your writing movement.
Some set-ups may need a separate overhead arm or phone support.
The NEEWER R10 clamp version reviewed and the R10 version with a tabletop base come with different supports and contents.
Compare the full product name, version number and list of included items; the R10 model name alone isn’t enough.
Check whether you’ll need a phone holder or another support for the version you choose.
The BASICS R10 has been reviewed as a version with a desk clamp and arm, making it an option if you want to keep the writing area clear. It comes with different kit from the R10 with a tabletop base.
The SpotLight Smart 80 II (00004657) is a ring light set with a tabletop tripod and phone holder, designed for anyone who wants a compact set-up they can move around.
The LR120 is a standalone ring light for anyone who wants to position the light and camera support separately.
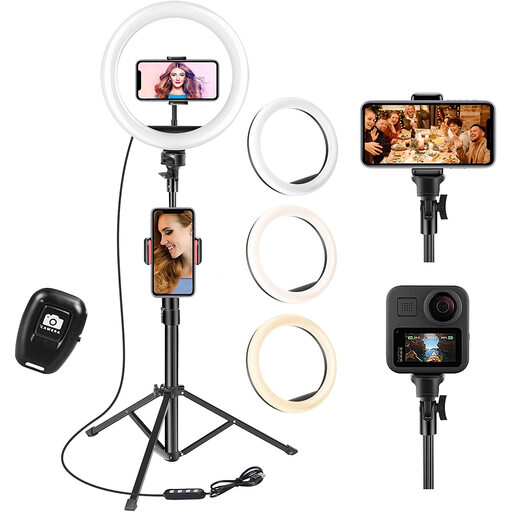
This ring light with tripod is one option to consider when filming a lesson with a camera on a small table. Check that the height and set-up suit your paper and writing movement.
 No image available
The ring light and tripod included could work for a lesson set-up, provided the tripod height and camera angle suit your table.
Ring diameter: 10 inch. Tripod: 63 inch. Three colour settings and ten brightness levels. Remote control included.
Before buying, check the CE marking on this exact product for use in the Netherlands.
No, there’s no guarantee. Record a real brushstroke and move the light if the shadow falls across the active writing line. ULANZI describes using two lights positioned apart on either side as an alternative if one light isn’t enough.
Measure the usable edge of the table and leave room for your full writing movement. Then check the mount and reach of the version you’re considering; a clamp arm and a tabletop base aren’t the same kit.
No, follow the power requirements for the exact model. The Godox LR120 manual specifies 5 V/2 A for the light and an adapter rated above 5 V/2 A; don’t assume the same requirement applies to other models.
The Netherlands Food and Consumer Product Safety Authority says CE marking is mandatory for electrical products. Check the marking on the actual product on offer. Godox’s declaration applies specifically to model LR120 and doesn’t replace checking a different model or brand.
For an online distance purchase from a business, the Dutch Government says you’ll generally have a 14-day cooling-off period; purchases from private individuals aren’t covered by this description. If a product is faulty, the seller must handle the statutory guarantee. There’s no fixed statutory guarantee period in the Netherlands.
Milieu Centraal recommends taking broken electrical appliances to an appropriate collection point. When you buy a new, similar appliance, you can hand in the old one free of charge.