Vandaag of morgen in huis

Kwaliteit gegarandeerd

Welkomstaanbiedingen ontgrendelen: GRATIS bezorging | Tot 80% korting | Gratis 30 dagen JoyPlus-proefperiode
Download de app
An RGB kit can transform a standard interior into a personalised car styling setup. However, kits vary considerably in their connections, light distribution, controls and installation. If you focus only on “16 million colours” or music synchronisation, you could end up with a kit that’s difficult to install, doesn’t fit your car properly or gives off uneven light once fitted.
This buying guide will help you compare RGB LED interior lighting for your car with confidence. It focuses on verifiable specifications, practical installation and avoiding common purchasing mistakes.
Universal car lighting may be suitable for cars, SUVs, vans and pick-ups, but the available space varies from one interior to another. A thick strip won’t always fit into a narrow dashboard gap. So check the dimensions of the light strips, the cables supplied and where the controllers will go.
With a 12V kit, it’s also important to check that your vehicle actually uses a 12V connection. A 24V commercial vehicle or bus may need a suitable voltage converter. Don’t connect a product directly if its voltage doesn’t match the product information.
A product may claim to have hundreds of LEDs, but that doesn’t automatically mean every area will be lit evenly. With a conventional RGB LED strip for cars, individual points of light may be visible. An acrylic light guide or fibre-optic construction distributes light differently. So check the type of light guide and where the strips will be installed.
According to the product description for the Dreamcolor acrylic kits, an acrylic lens distributes the light along the strip. This is a supplier specification; the final appearance also depends on the installation, the surface and the lighting mode you choose.
Music-reactive car lighting uses a microphone in or near the controller to detect sound in the surrounding area. The lights therefore respond to the sound they pick up. The result can vary depending on the volume, background noise and sensor position. Make sure the microphone opening remains unobstructed, and don’t expect every beat to match a streaming app exactly.
For most cars, 12V LED car lighting is the obvious choice. Check whether the kit is powered through the cigarette lighter, a USB adapter or a switched ACC connection. A cigarette lighter connection is straightforward for DIY installation. Connecting it to the fuse box can look neater, but requires more knowledge of vehicle wiring.
Test the kit before securing the strips in place. Keep cables away from pedals, the steering mechanism, seat rails and other moving parts.
Car interior lighting with an app generally offers more settings than a simple remote control. Check:
Bluetooth controls work within the controller’s range. The supplied product information gives a range of 0 to 10 metres for various Dreamcolor models.
According to the product specifications, a fibre-optic LED strip for cars or acrylic light strip must not be folded sharply. Excessive bending can damage the light guide. Only cut at the marked points. With some kits, the final section may show a different colour or behave differently when synchronised after shortening.
Measure the dashboard edge, door panels and footwell beforehand. Allow some extra length around bends and connections. Using multiple controllers can power different zones, but requires more cable management.

Why it suits this user: This kit combines six acrylic strips with four footwell lights, and is designed to fit into gaps in the dashboard and interior. According to the product description, the app offers preset colours, dynamic modes and sound detection.
The product information specifies 12V operation, multiple controllers and strips that can be cut at designated points. Testing the kit before final installation is still essential.
12V connection, app control, six acrylic strips and four footwell lights, according to the product listing.

Why it suits this user: Dual-zone control is useful if, for example, you want to set the dashboard lighting and footwell lights separately. According to the product description, the kit supports app control, music detection and separate colour modes.
The kit comes with one main controller and four sub-controllers, allowing several installation zones to be synchronised. Check beforehand where the controllers will fit in your car.
Dual-zone settings, 12V operation, 593 stated LEDs, and zones for the footwell, door handles and storage compartments, according to the listing.
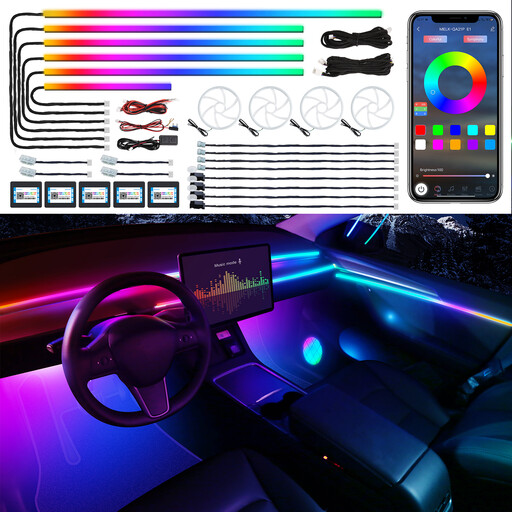
Why it suits this user: This version is designed for an extensive interior installation, with lights for the footwell, door handles, storage compartments and door speakers. It’s a good fit for car styling enthusiasts who want to combine several zones.
The product listing specifies the included components and dual-zone control, helping you assess in advance how much wiring and installation work will be needed.
22-in-1 configuration, four additional door zones, app control and a music-reactive mode, according to the product description.
We’ve put together a complete, up-to-date list of products that meet these strict selection criteria and comply with current European safety regulations.
Many kits can be fitted at home, especially those that connect via a 12V plug. The level of difficulty depends on the number of zones and how you want to conceal the cables. A simple kit with footwell lights takes less work than one with door panels and multiple sub-controllers.
Lifespan depends on heat, moisture, vibration, installation quality and how long the lights are used. Use the voltage specified in the product information and avoid sharp bends. A loose or poorly secured strip may be damaged before the LEDs themselves.
Power consumption varies depending on the number of LEDs and lights, as well as the brightness setting. When connected to a switched 12V supply, the lights only work when the car is running. Don’t leave a kit connected permanently if the controller doesn’t have an automatic shut-off.