Vandaag of morgen in huis

Kwaliteit gegarandeerd

Welkomstaanbiedingen ontgrendelen: GRATIS bezorging | Tot 80% korting | Gratis 30 dagen JoyPlus-proefperiode
Download de app
RGB car interior lighting with an app can transform a standard interior with splashes of colour on the dashboard, in the doors and around the footwells. However, not every kit will suit your car or installation plans. Marketing terms such as “16 million colours”, “plug-and-play” and “universal” only tell you so much: you also need to check the power supply, connections and included components.
Many kits are advertised as suitable for all cars, SUVs and trucks. In practice, you need to check whether your vehicle has a 12V system. A 24V van, bus or truck cannot be connected directly to a 12V kit without a suitable voltage converter.
Also check the space available in your dashboard and door panels. An acrylic fibre-optic LED strip is designed to fit into seams and gaps, but not all interior trims have enough room for one.
A product might include, for example, 175 inches of strip material but only a few connection points or footwell lights. So check whether the kit also includes controllers, extension cables, mounting tape, a pry tool and any additional lights you want.
A simple car footwell lighting setup needs different components from a system that lights the dashboard, door handles, storage compartments and door panels.
With music-reactive LED lighting, the built-in microphone responds to the sound picked up by the sensor. This isn’t the same as a direct connection to your audio system, so background noise or voices can affect the lighting effects.
According to the product listings for the kits below, the sensor can change colours in response to music or sound. Think of this as a lighting effect, rather than a guarantee of perfect synchronisation with every sound source.
Before buying, check the following:
Excessively high voltage can damage components. Voltage that’s too low can reduce brightness or response speed, according to the product information.
An acrylic fibre-optic LED strip spreads light through a clear tube or acrylic guide. Many of the kits listed here use strips about 11.7 mm wide, which can be shortened at designated points.
Keep these limitations in mind:
A bend that’s too sharp can reduce light transmission. Measure the dashboard, door panels and footwells before cutting the strip.
The kits use Bluetooth and a separate app, such as “Lotus Lantern”, “LotusLamp X”, “Magic Lantern” or “LED LAMP”, depending on the model. Check the exact app in the product description and scan the controller’s QR code.
Features may include:
A kit with multiple controllers can operate the dashboard, doors and footwells separately. So don’t just look at the number of colours: pay particular attention to how the zones are arranged.
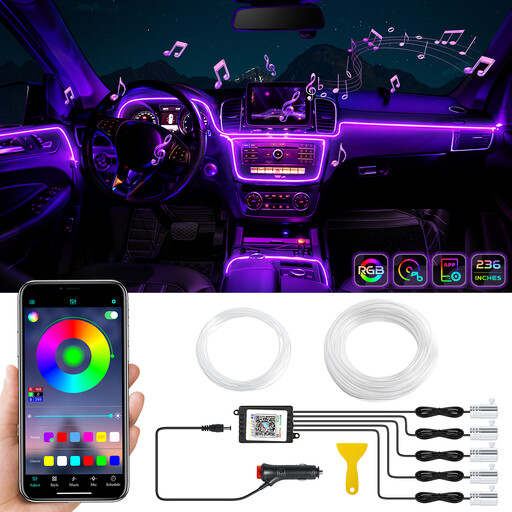
Why it suits this type of buyer: This starter kit is a good choice if you want to add an accent to your dashboard or doors without wiring up every interior zone straight away. The product listing mentions five RGB LED lights, an optical fibre line, a clear tube and a car charger.
The included components are clearly listed, so you can check in advance whether this compact setup suits your installation plans.
Bluetooth app for iOS and Android, 12V connection, sound response, and adjustable static or dynamic colours.

Why it suits this type of buyer: This comprehensive kit is designed for a polished interior, with dashboard strips, footwell lights, door-handle lighting and lights in the door pockets.
The product listing specifies the main controller, four sub-controllers and separate lighting zones, making it easier to assess the wiring setup in advance.
RGB Smart IC, dual-zone control, 12V specification and a range of accessories for a comprehensive interior installation.

Why it suits this type of buyer: As well as footwell and door-handle lighting, this version adds lights for door pockets and door speakers. It’s a good fit for customisation projects that involve updating several details at once.
The lighting components and controllers are listed separately in the product information. Be sure to check the space available and the route for the additional cables.
22-in-1 configuration according to the product listing, music response, Smart IC effects and lighting for multiple door zones.
We’ve put together a complete, up-to-date list of products that meet these strict selection criteria and current European safety regulations.
Many 12V kits can be installed at home, but the difficulty depends on the zones you choose and how you connect the power. A car charger is usually simpler than wiring into a fuse box or ACC circuit. Always follow the supplied instructions and test the kit before fitting it permanently.
Its lifespan depends on use, heat, moisture, mechanical stress and the quality of the connection. The product information for these kits doesn’t give a standard lifespan. Avoid sharp bends, don’t pull on the cables and use the recommended voltage.
Power consumption varies by kit and by the number of lights in use. If connected to a switched 12V supply, the lighting switches on and off with the vehicle. Check that the lights don’t stay on when the car is switched off, to avoid draining the battery unnecessarily.