Start with the framing you need: a kit zoom may be enough for complete patches, while individual stitches may call for a suitable, compatible macro lens. So consider not just the camera body, but also the lens and the space you have on your table for lighting. Canon Netherlands lists maximum magnification for the RF-S 18-45mm at 45 mm as 0.16× with autofocus or 0.26× with manual focus.
Who is this set-up for?
Patch product photographer
You photograph several patches for a shop or portfolio and want repeatable framing and consistent colours. Canon’s product photography tips cover using a fixed shooting set-up, while Canon Netherlands also explains white balance.
Looking to capture stitch detail
You want to capture yarn, edging or individual stitches in close-up, so you choose a lens partly based on magnification and the space available for lighting. Compare the specifications of individual lenses from Canon, Nikon and Fujifilm.
Beginner with a small table
You want to start by photographing complete patches without buying a separate macro lens straight away. Check what the kit lens can do and exactly what’s included in the set; Canon Netherlands lists the contents of its EOS R50 kit.
What should you look for when choosing?
First decide how much of the patch you want in the frame and which details need to be visible. Also consider your lighting set-up and what comes with the initial camera kit.
| What to consider |
What should you look for? |
Who is this important for? |
| Magnification and framing |
Compare the maximum magnification of the exact lens with the framing you want. For close-ups, also allow space in front of the lens for lighting. |
If I want to capture individual stitches in close-up, I focus on both magnification and the space I have to work with. Around 29% of consumers put magnification for detail at the top of their list. |
| Colour and lighting |
Check whether you can adjust the white balance, and keep your lighting set-up consistent when comparing colours. |
If I want the colours of successive patches to look consistent, lighting and white balance matter. Around 29% of consumers say colour reproduction is their main purchasing concern. |
| Focus and set-up |
Check whether you can position the camera securely and assess the focus on the stitches. |
When photographing a series of patches, I want to be able to keep the same angle and focus. Around 21% of consumers prioritise a repeatable set-up. |
| What’s included in the kit |
Compare the body-only option with the exact kit contents, lens mount and any lens you might need later. |
If I want to start with one practical starter kit, I check what’s actually included. Around 21% of consumers prioritise what comes with their first kit. |
Common pitfalls
-
Assuming ‘macro’ means the same magnification for every kit
Maximum magnification depends on the specific lens. The Canon RF-S 18-45mm kit lens and the separate RF 35mm macro lens have different stated magnifications.
Compare the exact lens included in the box with the close-up framing you want.
-
Confusing the focusing distance with the working space in front of the lens
Nikon lists both a minimum focusing distance of 0.16 m and a distance of 7.2 cm between the front of the lens and the subject for the Z DX MC 35mm f/1.7. On a small table, that working space affects where you can place your lighting.
Check the space in front of the lens at your intended magnification, and leave room for your lighting set-up.
-
Choosing a different body without considering your table-top set-up
A different body won’t automatically solve inconsistent lighting colour. A fixed camera position also helps you keep the composition consistent.
First try a fixed shooting angle and even lighting; if the lighting changes, check the white balance too.
Brands to compare
Canon
The EOS R50 kit with the RF-S 18-45mm is an option for wider shots. The separate RF 35mm F1.8 MACRO IS STM offers a different magnification for close-up shots.
- Canon Netherlands lists maximum magnification for the kit lens at 45 mm as 0.16× with autofocus or 0.26× with manual focus; the RF 35mm is listed at 0.5×.
- These figures apply to the lenses mentioned, not every Canon kit.
Nikon
The Z50II is a Z-system mirrorless camera. The separate NIKKOR Z DX MC 35mm f/1.7 is a DX macro lens for anyone who wants to photograph stitches up close.
- Nikon lists a 0.67× reproduction ratio on the sensor for this lens, with 7.2 cm between the front of the lens and the subject at the minimum focusing distance.
- Nikon also describes this as ‘1:1 in 35 mm/FX format’; this is not the same as 1:1 reproduction on the sensor.
Fujifilm
The X-S20 can be paired with the separate XF30mmF2.8 R LM WR Macro for an X-system set-up with a macro lens.
- Fujifilm lists 1:1 magnification and a minimum focusing distance of 10 cm for this lens.
- At such a short distance, the lens may limit where you can position your lighting on a small table.
Sony
The APS-C α6400 uses the E-mount. The separate E 30mm F3.5 Macro SEL30M35 is a macro lens for this mount.
- Sony lists 1:1 magnification for the SEL30M35.
- This macro magnification is a lens specification, not a specification of the α6400 body or any zoom lens supplied with it.
Joybuy products
This Joybuy pick is suited to anyone who wants to start by framing complete patches with a standard zoom on a small table. For close-ups of individual stitches, check whether the supplied lens can achieve the framing you want.
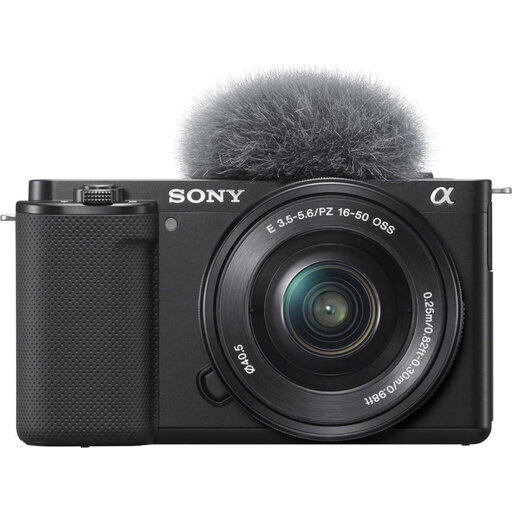 Image unavailable
Sony ZV-E10 + 16–50mm zoom, black
The supplied zoom is useful if you want to start by photographing complete patches with flexible framing; for close-ups of stitches, check whether it can achieve the framing you want.
The kit includes a 16–50mm zoom and a 24.2 MP APS-C sensor. The description also mentions a vari-angle touchscreen and a Product Showcase setting for objects.
An SD card and adapter/charger are not included.
Joybuy
Frequently asked questions
Do I need a 1:1 macro lens for every patch?
No, it depends on the framing you want. For a complete patch, first see whether the supplied kit lens is enough; for individual stitches, compare the magnification of a compatible macro lens.
How can I keep photos of successive patches consistent?
Keep the camera, patch and lighting in as much the same position as possible. Canon’s product photography tips recommend using a tripod to help keep the composition consistent; if the lighting changes, check the white balance too.
What should I know about after-sales support when buying online in the Netherlands?
For distance purchases, you generally have a 14-day cooling-off period; the Dutch government advises checking the applicable exceptions and the seller’s information. Your statutory rights if a product is faulty are separate from any commercial manufacturer’s warranty.
Is a CE mark relevant for a camera sold in the Netherlands?
Yes. The Dutch government lists electronic devices among the products that need a CE mark in the EU. Check the product and seller information when you buy, too; a CE mark doesn’t tell you whether a particular lens is compatible with a particular camera body.