Vandaag of morgen in huis

Kwaliteit gegarandeerd

Welkomstaanbiedingen ontgrendelen: GRATIS bezorging | Tot 80% korting | Gratis 30 dagen JoyPlus-proefperiode
Download de app
An LED RGB strip can quickly transform a dark car interior. However, not every kit is equally suitable for a dashboard, door panel or footwell. Cheaper kits can cause problems, particularly when voltage information is unclear, Bluetooth functionality is limited or an optical fibre gets kinked during installation.
This buying guide helps car enthusiasts, tuning fans and DIYers in the Netherlands compare LED ambient lighting for car interiors using verifiable product information. You’ll find out what to look for in an RGB LED strip for your car, how to install a kit and which type suits your needs.
Many kits are advertised as universal for cars and trucks. That doesn’t necessarily mean the cables will be long enough for every dashboard or door panel. So, check:
A vehicle with a 24V electrical system, such as some commercial vehicles or buses, cannot simply be connected to 12V car LED lighting without a suitable voltage converter.
“16 million colours” sounds appealing, but what matters in practice is how you control the lights. Check whether the kit supports an app for iOS and Android, whether it requires Bluetooth, and whether you can adjust the brightness, speed and schedules. Music-synchronised LED lighting usually works via a microphone in the controller. This means it responds to ambient sound, not necessarily directly to the car stereo’s audio signal.
Acrylic and fibre-optic LED strips can often be cut to size, but only in line with the manufacturer’s instructions. According to the product information for several Dreamcolor kits, you should leave enough length when cutting and avoid resistors or connection points. Cutting in the wrong place can leave a section unlit or cause the colours to fall out of sync.
For most cars, SUVs, vans and light trucks, 12V DC is the relevant voltage. Product information may also specify a range of 10–16V. Always check the kit’s label and connection before installing the lights.
A connection via the 12V socket is generally accessible for a DIY installation. If you’re connecting the lights to an ACC circuit or fuse box, make sure loose cables are neatly secured and kept clear of the pedals, steering components and moving seats.
A standard LED strip emits light from visible diodes. An acrylic LED strip or fibre-optic LED strip for cars uses a light guide to spread the light along a line. According to the product description for the Dreamcolor Acrylic Interior Car LED Strip Light, the strip is approximately 11,7 mm wide and designed to fit into the seams of dashboard and door panels.
Look out for the differences between:
Car interior lighting with an app may offer features such as static colours, colour changes, chase effects, brightness control and music or voice synchronisation. According to the product information for the kits mentioned, these use apps such as “Lotus Lantern”, “LED LAMP” or “LotusLamp X”. Check in advance which app is compatible with your exact version.
An RGB Smart IC can control dynamic effects, but a static colour is often more comfortable while driving. Position the lights so they don’t cause distracting reflections in the windscreen or obstruct your view of the instruments.
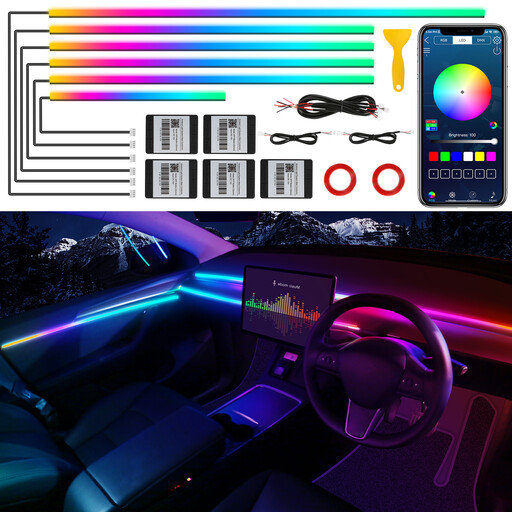
Why it suits this user: This kit combines six strips of varying lengths with four footwell lights. It’s a good choice if you want to add dashboard and footwell lighting without fitting out the door panels straight away.
The product information specifies 12V, Bluetooth app control and clear strip lengths. Test the lights first and only cut them as instructed.
App and touch controls, six acrylic strips, four footwell lights, and support for static and dynamic colour modes.
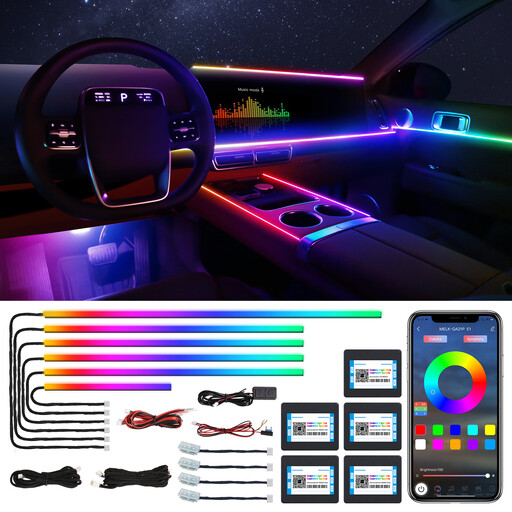
Why it suits this user: This version is designed for a more extensive car ambient lighting project, covering the dashboard, footwell, door handles and storage compartments.
The kit uses a main controller and four sub-controllers. According to the product information, you can control multiple zones together or separately.
600 LEDs according to the product information, dual-zone control, a music function and accessories for multiple areas of the interior.
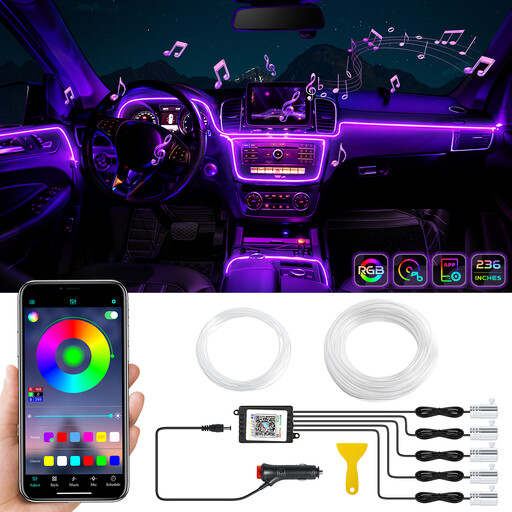
Why it suits this user: The 236-inch optical fibre is a good option if you want to create several lines of light in a car, SUV, van or truck with a 12V connection.
The instructions explain how to fit the fibre into the transparent tube and divide it into three to five sections. This helps you plan the installation more accurately in advance.
Bluetooth app, 29 preset modes according to the product information, a music function and approximately 6 metres of optical fibre.
We’ve put together a complete, up-to-date list of products that meet these strict selection criteria and applicable European safety regulations.
When driving on public roads, it’s best to use the lights as interior accents only. Make sure the colours or effects don’t shine outside or distract other road users.
Most kits connect to a 12V power source, such as a car adaptor or a suitable ACC circuit. Fit the strips in the dashboard and door panels, connect the controllers, then pair them with the Bluetooth app. Test everything before securing the components in place for good.
Lifespan depends on heat, moisture, voltage, bending and the quality of the installation. Use the kit within its specified temperature range, avoid sharp bends, and check regularly for loose cables or adhesive tape.
LED lighting generally uses little power, but the exact consumption varies by kit, number of lights and brightness setting. Switch the lights off when the car is parked for a long time, and only connect a permanent power supply after checking the standby current.